Advanced User Tips
Here are some tips and information that we have developed or received from our customers over the years that may help you to use your TypeMatrix product even more effectively.
Adjustment to / Using the Keyboard
How to Identify and Name Individual Keys
Putting a small bar or square of stick-on Velcro on the keys that you want to identify readily greatly helps in the early adjustment stage — for example, the index fingers of both hands on the home row; the Fn key; the Ctrl key — whatever key you use frequently and need some extra help to locate in the beginning.
Keyboard Skins
We now have clear or black, flexible silicone skins that fit beautifully over the EZR 2030 keyboard (not available for the 2020 — sorry). These are great for total protection of your keyboard from dust, debris, and spills. The black version also allows you to easily add another legend (QWERTY for Dvorak labeled keyboards, or vice versa). Check the order page for this product.
Cases
One of our customers found a suitable case for protecting the keyboard if you plan to carry it with you from place to place: http://www.cowboyneeds.com/CasesPass.html. Order the large size which fits well for both the 2020 and the 2030 models. (Price: $21.95 plus s/h)
Cleaning
We have found that frequent cleaning of the keyboards is very important. Debris of all sorts may accumulate under the keycaps after several months of use, but can be eliminated easily regularly using a vacuum over the keycaps to remove dust and debris, or by using a compressed air product, such as DustOff, to blow out anything that may be resting in unwanted places.
Sticky Keys
If your keyboard develops "sticky" keys, or keys that do not function consistently, most likely a piece of debris is preventing a clean contact with the electronics, and we have developed instructions to assist you in cleaning more thoroughly under the keycaps:
- Turn off your computer.
- Gently lift the affected keycap up from the bottom until it clicks open, like it's on a hinge. For the vertically oriented keys, lift from the right side up, hinging on the left hand side.
- Check under the keycap, using a flashlight if needed, to see if there are crumbs or dust particles collected there that may be interfering with the contact to the keyboard, being careful not to disturb the double-scissor mechanism, if possible. The best way to clean this area is to use the pressurized air.
- If you do happen to lift the entire keycap and dislodge it from the scissor mechanism, see the next section "Reassembling Keys" for instructions.
- If you know that there is trouble with the double scissor mechanism, contact us also for the possibility of replacement of these parts.
- Check the silicone dome at the center of the key structure — is it mushy or off-center?
- You may want to check another key that is operating correctly in order to compare the structures and operating mechanisms.
- Once you have examined the key thoroughly, place the keycap back directly over the underlying structure and gently but firmly press down. The keycap should click back into place. Try it now and see if any difference can be noticed.
Reassembling Keys
If a keycap should come off during the cleaning process, or due to some other reason, we have a set of instructions to reassemble the keys:
- Should the little rubber domes become worn out, please contact us to obtain replacements. If they have simply become loose, a single drop of superglue under them in the center of the key mechanism will hold them firmly in place.
- There are two pieces that make up the unique scissor-mechanism under each keycap on the TypeMatrix keyboards. They look basically like the pictures below:
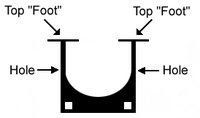
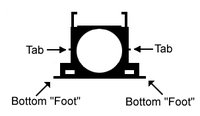
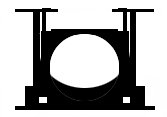
- To assemble, place both pieces on a flat surface oriented like the pictures above with the top feet on Piece #1 touching the surface and the bottom feet of Piece #2 touching the surface. Piece #2 goes underneath and inside Piece #1, with the tabs on the sides of Piece #2 clicking into the holes on the sides of Piece #1, so that it looks like this, when collapsed:
- Hold the double, connected piece, so that the "feet" are in a downward direction towards the keyboard. The "top feet" of Piece #1 should be facing the top of the keyboard and the "bottom feet" of Piece #2 should be facing the bottom of the keyboard (like the "Top-view" above).
- Slide the top two feet under the two housing slots on the keyboard structure where the key would go, like this:
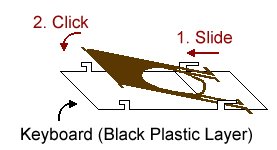
Lay the scissor mechanism flat against the keyboard and press the bottom feet into place. You will hear a "click" sound.
- Once the scissor mechanism has been clicked into place correctly, the keycap is centered over the mechanism and pressed into place gently, but firmly. Again, you will hear the keycap click into place at the top and at the bottom of the keycap.
Mac Users
How to set up your TypeMatrix 2030 for OS X.
This document references OS X 10.9 and the accompanying version of Karabiner (formerly called "KeyRemap4Mac")
A helpful user let us know that a modern version of Karabiner looks like this when properly configured:
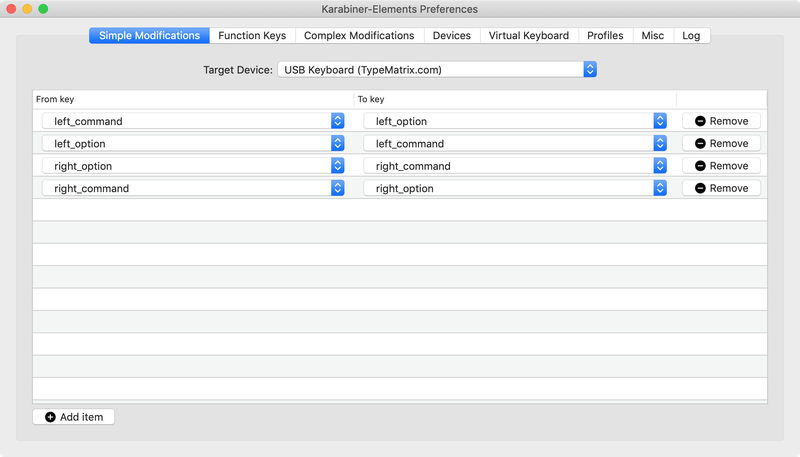
Key Mapping
How TypeMatrix keys are mapped to OS X keys:
- The
Optionkey becomes theCommandkey on both the right and left sides - The
Commandkey becomes theOptionkey on both the right and left sides Print ScreenbecomesF13Scroll LockbecomesF14Pause/BreakbecomesF15F12opens and ejects the CD- The
Fnkey won't be recognized by OS X
Karabiner
How to swap Command and Option keys using Karabiner (formerly KeyRemap4Mac):
Step 1: Move Command_L to Option_L
Open Karabiner and search for "option_l to command_l", check the options you see here:

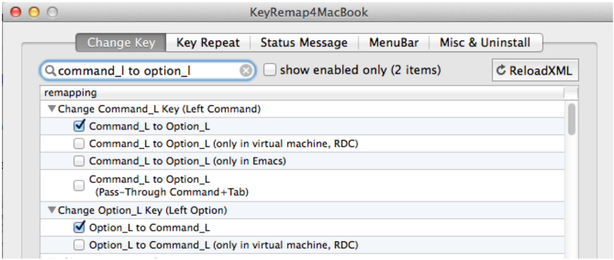
Step 2: Move Option_L to Command_L
Search for "command_l to option_l", check the options you see here:
Step 3: Switch the same keys for the right side
Repeat steps 1 and 2 and replace "L" with "R".
PS/2 Adapter
For the PS/2 version of the 2030 (non-USB):
Belkin USB to PS/2 Adapter Part #F5U119-E — Research and feedback from customers has now led us to recommend the use of the Belkin USB adapter for all Mac applications. We no longer offer it for sale online, but you may contact us or shop on any of the sites where Belkin products are sold.
Y-Mouse Keyboard and Mouse adapter for USB — available at http://www.ymouse.com/ymouse/whym08.php. We know this adapter works, although it is a bit expensive at $49.95.
We will continue to add to this list as we learn of other acceptable devices.
Key changes on Mac OS:
- The
Startkey (Windows key) becomes theApplekey - The
Altkey becomes theOptionkey - The
Ctrlkey remains theControlkey Print ScreenbecomesF13Scroll LockbecomesF14Pause/BreakbecomesF15F12opens and ejects the CD
Typing Tutors for Mac
For Mac Typing Tutors that also assist in learning the Dvorak layout, here are some suggestions given to us by Mac users:
- Masterkey 3.1.4 — http://macinmind.com/MasterKey/
- Ten Thumbs — http://www.tenthumbstypingtutor.com/
- Key Advantage Typing — http://www.programmingart.com/products/key/
- Typing Master — http://www.typingmaster.com/index.asp
Each of these programs contain unique features, so you must try them out to see which you prefer, and then purchase them online from the separate companies.
Keyboard Installation (Mac OS 10.4)
Initializing the TypeMatrix Keyboards with Mac OS 10.4
Booting up for the first time with the TypeMatrix keyboard will invoke the Keyboard Setup Assistant:
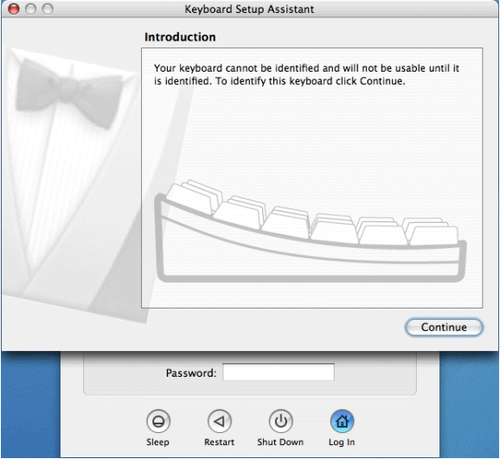
Click on the Continue button, bringing up the following window:
(Step 2 image unavailable — the original file was corrupted at the source.)
In this window, press the lower of the two keys on the right side of the left shift (this should be "z" for QWERTY or ";" for DVORAK labeled keyboards).
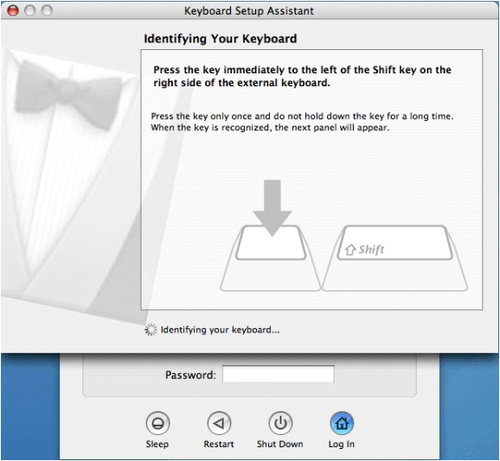
Press the "pipes" key (the one that has |, \, and the number 6 on it). Please note, you will stay at this window for a while. If there is no change after a couple of minutes, press the "pipes" key a couple of times. Either way brings up the following window:
(Step 4 image unavailable — the original file was corrupted at the source.)
Click on the OK button, bringing up the following window:
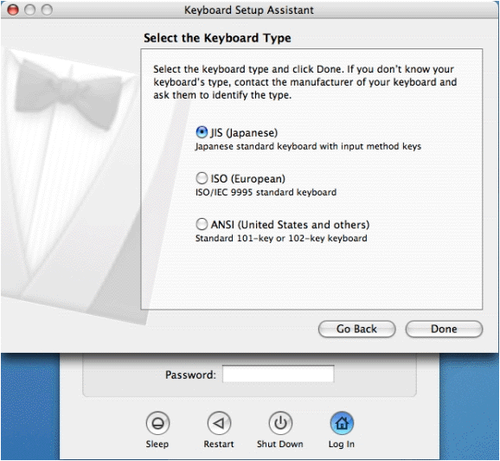
Click on the ANSI (United States and others) radio button...
(Step 6 image unavailable — the original file was corrupted at the source.)
Then click the Done button. The rest of the logon process will continue as usual.
Linux / Unix Users
Typing Tutors
The following typing tutors have been recommended to us for Linux:
- dvorak7min — http://freshmeat.net/projects/dvorak7mintutor/
- gtypist — http://www.gnu.org/software/gtypist/
- tuxtype — http://tuxtype.sourceforge.net/
(Thanks to Eric M. and Maura D. for sharing this information with us!)
Keymap Configuration
The following is somewhat of a specialized setup mailed to us, but we're posting it in hopes that it may help other Linux users.
This user informed us that he got things working with xorg-1.5 and kernel 2.6.29. In order to do this he used the evdev as the keyboard driver without options. He also had to configure the hald daemon to recognize keyboards and apply the right keymap to each of them as follows:
(Thanks to Simon Thabuteau for sharing this information with us!)
Xmodmap
If you use a .Xmodmap file, here is a sample that changes the "Start/Cut" button on the 2030 model to Control (something Linux/Unix users frequently request). We're told this works for most *nix flavors, but some modification may be required for you. If you want to modify the behavior of other keys, use the xev command and then hit the key in question to get the key name.
.Xmodmap (place this in your home directory):
<?xml version="1.0" encoding="ISO-8859-1"?>
<deviceinfo version="0.2">
  <device>
    <match key="info.capabilities" contains="input.keymap">
      <append key="info.callouts.add" type="strlist">hal-setup-keymap</append>
    </match>
    <match key="info.capabilities" contains="input.keys">
      <merge key="input.xkb.rules" type="string">base</merge>
      <merge key="input.xkb.model" type="string">keyboard</merge>
      <match key="/org/freedesktop/Hal/devices/computer:system.kernel.name" string="Linux">
        <merge key="input.xkb.model" type="string">evdev</merge>
      </match>
      <merge key="input.xkb.layout" type="string">fr</merge>
      <merge key="input.xkb.variant" type="string" />
      <match key="info.product" string="TypeMatrix.com USB Keyboard">
        <merge key="input.xkb.layout" type="string">dvorak</merge>
      </match>
    </match>
  </device>
</deviceinfo>
EZ-Reach Remapping
Some EZ-Reach users have expressed the desire to have the Home, End, Page Up, Page Down keys and the Insert key directly accessible on this keyboard. Here are suggestions to remap your keyboard this way, and any other way you may want:
Windows Users
- AutoHotKey — http://www.autohotkey.com/
- KeyTweak — http://webpages.charter.net/krumsick/
- Microsoft Keyboard Layout Creator — http://www.microsoft.com/globaldev/tools/msklc.mspx
Linux Users
Use .Xmodmap with these codes (these are for the 2020 model; codes for the 2030 may be different — if you have detailed information about this, please write us):
The Application or Menu key has no real use and can be modified as you see fit. It is keycode 117.
Mac Users
- DoubleCommand — http://doublecommand.sourceforge.net/
- Keyboard Maestro — http://www.keyboardmaestro.com/main/
- Ukelele — http://scripts.sil.org/Ukelele
- ADB Keyboard hacks in Mac OSX Tiger (10.4) — http://www.snark.de/index.cgi/0007
add Control = Super_L
keycode 75 = Home
keycode 76 = End
keycode 95 = Prior
keycode 96 = Next
keycode 97 = F9
keycode 103 = F10
keycode 99 = F11
keycode 105 = F12
Disabling Ctrl+Enter in Outlook
Some of our users prefer to disable the Ctrl+Enter shortcut in MS Outlook (it causes an email being worked on to be sent immediately) because the arrow keys are right next to the Enter key, and since Ctrl+Arrow is a combination for navigating from word to word.
You can disable this shortcut in Outlook's settings or via a registry modification. Search for "disable Ctrl+Enter Outlook" for current instructions for your version of Outlook.
(Thanks to Patrick B. for bringing this to our attention)